


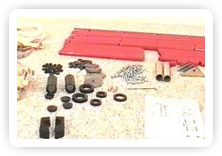

On seeing of conglomerate of tubes, spare parts and ropes after unpacking the shipment, you will no doubt ask yourself: CAN THIS POSSIBLY BE TURNED INTO CLIMBING EQUIPMENT?
But after assembling work lasting less than one-two hours, you will find that it was not quite so difficult.
To make it even easier, we are enclosing some hints and bits of advice, which however should not be regarded as a substitute to the assembling instructions
1. Prior to commencing with the unpacking, you should measure the height of you room exactly that part of the rooma, where equipment, as mentioned in the assembling instruction. Should you find Monkey Gym does not fit in the room, do make a point of contacting your seller immediately.
2. Check the total number of spare parts with the specification in the instruction. You should commence the assembling only, if and when all parts are available.
3. Check the ceiling in you room. The Monkey Gym cannot be fitted on slanting ceiling or ceiling made of separate panels, which are suspended on wires. In case of firm ceiling made of concrete, you can immediately commence with the assembling work.
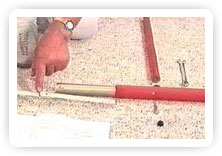
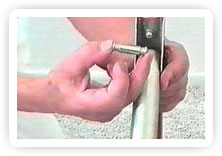
4. You can calculate the length, to which the height adjustment should protrude from the top-part of the ladder in accordance with the formula shown in the assembly information. Should the holes of the protruding inside not quite coincide with the hole of the outer bar, push the inside in a little more, until the holes coincide, after which you secure the position with the screw.
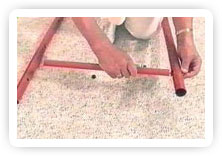
5. Next, you connect the lower with the upper ladder parts, you fit rungs in and you assemble the ladder, preferably flat on the floor. The black washers are placed between rung and ladder frame.
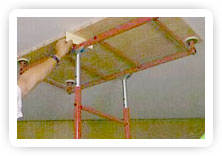
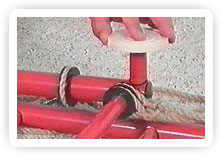
6. Prior to tightening the screws on the ceiling frame, it is important to consider and to decide precisely, which part of the supplementary equipment should be fitted where. Select the black gliding rings for the sport equipment and attach the above equipment to these rings. The gliding rings for the larger diameter are for the ladder frame, those with the smaller diameter are for the rings.
7. Start with the fastening of the triangular on to the ceiling frame. Move the sports equipment on to the rungs or the ladder frames. Only them should you commence with tightening of the screws for the ceiling frame, rather like with the ladder. Finally you fasten the four supports. Please note that support should not point in the same direction as the holders.
8. Connect the metal ladder and the frame with the pin in such a way that pin is firmly placed.
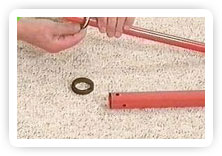
9. Prior to putting the equipment upright, do not forget to place the black shells onto the lower ends of the ladder and to fasten them with adhesive tape.
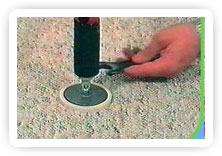
10. Place the Monkey Gym flat on the floor, so that the support point to the top. Fasten the white rubber plugs firmly on to the washers. Then press the washers with the rubber plugs onto the supports.
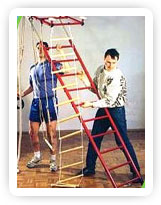
11. In order to put the equipment into an upright position, you definitely require somebody to assist you and you may also require a pair f steps. Place the two washers discs in the correct positions on the floor. Then lift the equipment upright. Your assistant should hold the ceiling frame in a horizontal position.
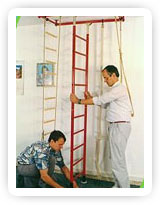
12. With the equipment positioned reasonably straight in the appointed area of the room, the tension screws at the bottom of the equipment should be evenly tightened, until a moderate degree of pressure against ceiling has been obtained. At the point you can still adjust and move the equipment. You should pay attention to ensure that the ladder is in completely vertical position-and not twisted in any way. If necessary, check the straight position of the ladder with aid of plumb line. Make sure that the pins, which connect the metal ladder with the ceiling frame, are firmly embedded in the holders.